By: Kevin Estela,
Owner/Head Instructor of Estela Wilderness Education
Since the last piece on bladed concealed carry, the laws haven’t changed and the unarmed could still freak out if they find out you have a blade on you. The options covered in the last article examined various ways to carry a blade around the neck, ankle, IWB and deep inside the pocket. Assuming these options don’t work for you, Part II of this concealed carry instructional provides five more ways to keep a blade on your person without anyone noticing.As with the other methods already described, one must understand the scenarios when and where each of these carry methods is ideal and the tradeoff between depth of concealment and speed of draw. These locations may not be where you would carry a blade but your adversary might. Remember with all of these, speed can be added to your draw stroke if you’re willing to sacrifice your cover garment by cutting through it For purposes of illustration, some of the methods are shown over clothing for better understanding.
Jogger’s Rig
I’ve heard plenty of stories of sneak attacks on runners. Whether you are a two-legged or 4-legged predator, a runner makes a great target as most are more concerned with their pace, distance traveled, or heart rate than they are with their safety. Runners aren’t known for carrying much gear with them for those “oh shit” moments and they are likely wearing next to nothing Some will carry a palm-sized canister of pepper spray, others will hold their phone to make that 9-11 call that will never come and others still will run with their keys tucked between their fingers to gouge at whatever threat comes their way. A better option is carrying a lightweight titanium blade like those from MISSION. Years ago, the “Merc Harness” became popular as the paracord construction reduced the bulk of the carry system. The jogger’s rig is similar but places the blade in the center of the chest where it will not get in the way of the runner’ arms. A couple loops of shock cord are created and these loops are connected in the back with another length of cord. The shock cord helps absorb the impact of the knife bouncing as you run.
Baldric/Under the Arm
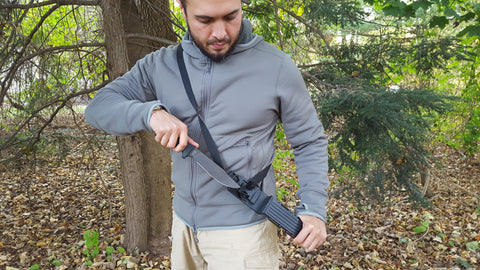
It isn’t always practical to carry a large blade on your belt if you’re concerned about concealment. Sometimes the bottom of the sheath pokes out and gives away the fact you’re carrying. A very simple rig, the baldric rig, can be fashioned with braided paracord and slung over the shoulder. This manner of carry works well for open carry or underneath a cover garment like a jacket. Depending on what strap is used for the rig, it can be adjusted for a high ride just underneath the armpit. If the blade needs to be drawn, the knife can be tilted outward and the blade will unsheath easily and forward. The baldric rig can be created out of flat webbing, old leather belts or a long neckerchief/bandana. It’s important to note the strap worn around the chest can be seen with a cover garment on unless that garment is zipped or buttoned up. This will slow down the access to the blade. However, a small length of cord can connect the strap on the side opposite the blade (think tanker-style holster) to pull it down on the torso. If the blade is needed frequently, the baldric rig can be adjusted and worn in the center of the chest too.
Sleeve
You probably recall looking through cheap mail-order magazines and seeing advertisements for the “wrist-mounted knife” or perhaps the “ninja throwing knives in wrist sheath”. Sometimes carrying a blade on your wrist is impractical but other times it makes sense. A knife worn on the outside of the forearm with the handle pointed toward the back of your hand is easily drawn from the rest or at-ease stance. The quickest blade draw is accomplished when the blade is already in your hand. From this casual stance, a person can have his fingers on the butt of the blade or on the lanyard. Drawing from this position requires moving the blade hand, the arm with the attached sheath or both simultaneously. It works exceptionally well for shielding strikes and elbows with the blade follow up. Just make sure to wear your watch on the opposite wrist to your blade as it could get in the way of a clean draw. Outside of defensive and concealed carry use, it is very comfortable while diving. The only drawback to this carry is the fact the blade can only be drawn with one hand.
Small of Back/Scout
Small of back carry allows the user to place a blade horizontally across the small of back for concealment. This manner of carry is effective in hiding the blade but it has it’s drawbacks. Small of back carry, sometimes referred to as “scout carry”, limits the user to drawing the blade with only one hand or the other. Resheathing is also very slow as is the initial draw since the user must make their hand travel to the rear to grab the blade then forward to deploy it. With hands in a combative stance and against a shot timer, quick draw strikes on a sound-producing target are always slower than the times of quick draws done from sheaths placed in the front of the body. Still, small of back carry has it’s place underneath heavy jackets or concealment shirts. Scout carry can be accomplished with the aid of duct tape, “ranger bands” or custom sheath.
Chest Pack
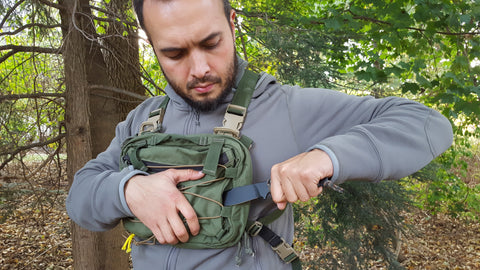
Many backpackers and outdoor enthusiasts have taken to chest-pack carry of pistols and other emergency gear instead of traditional belt-carried holsters. These chest packs are worn high on the torso and with a pull of a tab, allow the user access to his firearm. They are large enough for a handgun, a couple reloads, and a small fixed blade. There are numerous places where a blade can be tucked in or behind a chest pack including inside the gun compartment, behind the body of the main pack against the chest similar to a neck knife and deployed from the bottom of the pack and inside any accessory pocket separate from the gun compartment. Chest packs make it easier to carry essential gear when you have additional shoulder straps and waist bands around your body. On my personal chest rig, I have multiple places to stow a blade. As pictured, be careful you don’t have a blade draw that will damage your kit. Notice the edge orientation and how the blade could be carried under the lash tab instead. You can decide if the best draw is down and out or from the side and out depending on your own gear preferences.
With all of these carry methods, one must practice the draw and resheathing to be efficient in presenting the blade. When you find a method that works for you, be consistent with how you carry. You don’t want to reach in the wrong place only to find an empty space where you thought a blade would be. Be smart with your blade carry and ready for what life throws your way.


